What causes a person to be “shrink-wrapped” when the vacuum is turned on?
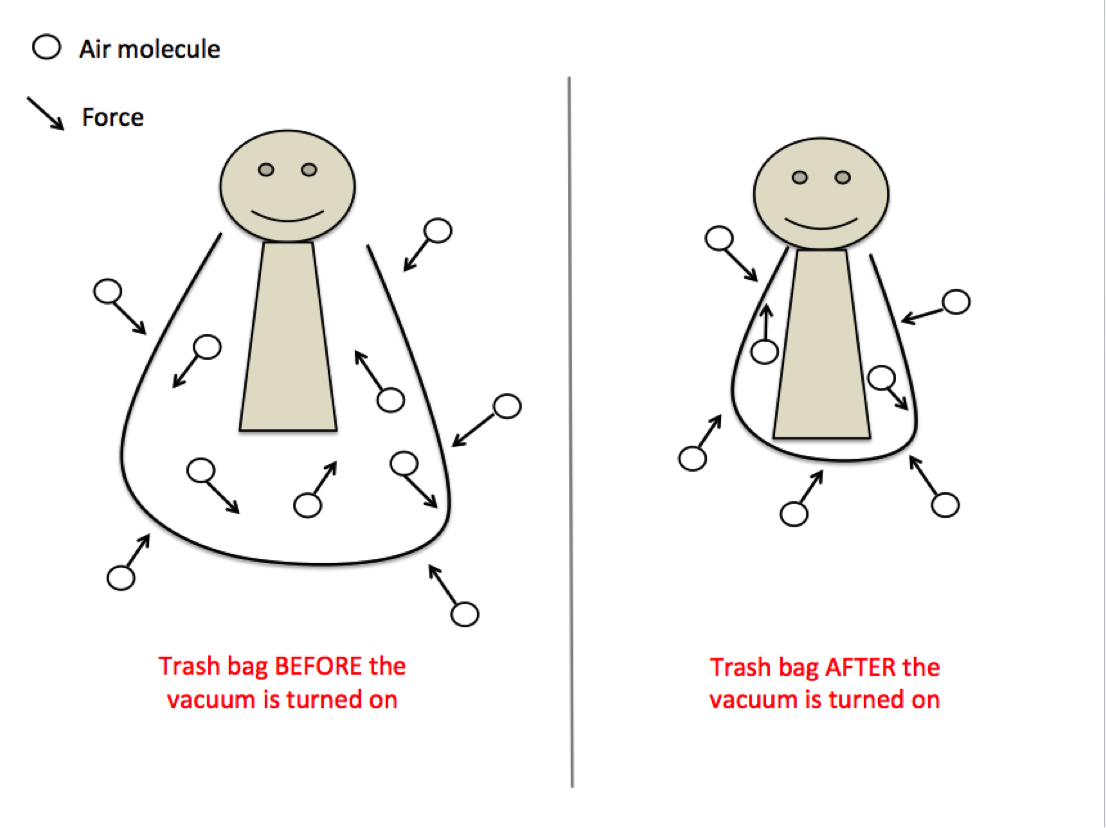
In this activity, participants climb into a large trash bag (with their head and neck remaining outside!) and remove the air from inside of the bag using a household vacuum cleaner. Before the vacuum cleaner is turned on, there is an equal density of air molecules inside and outside the bag. As described above, the air molecules are colliding with the inside and outside of the bag with equal force per unit area.
When the vacuum cleaner is turned on, most of the air is removed from inside the bag. When the air inside the bag is removed, there is no longer equilibrium. The force of the air molecules colliding with the inside of the bag is now close to zero, but the air molecules colliding with the outside of the bag have the same force per unit area as before. The air pressure that is outside of the bag (atmospheric pressure is about 14.7 psi on the surface of the earth) is now unopposed by an equal force of air pressure inside the bag. Thus, the bag is not being sucked onto your body by the vacuum cleaner; rather, the bag is being pushed onto your body by the air outside of the bag.
How is this related to the pressure change that a fish might feel when coming up from the “twilight zone”?
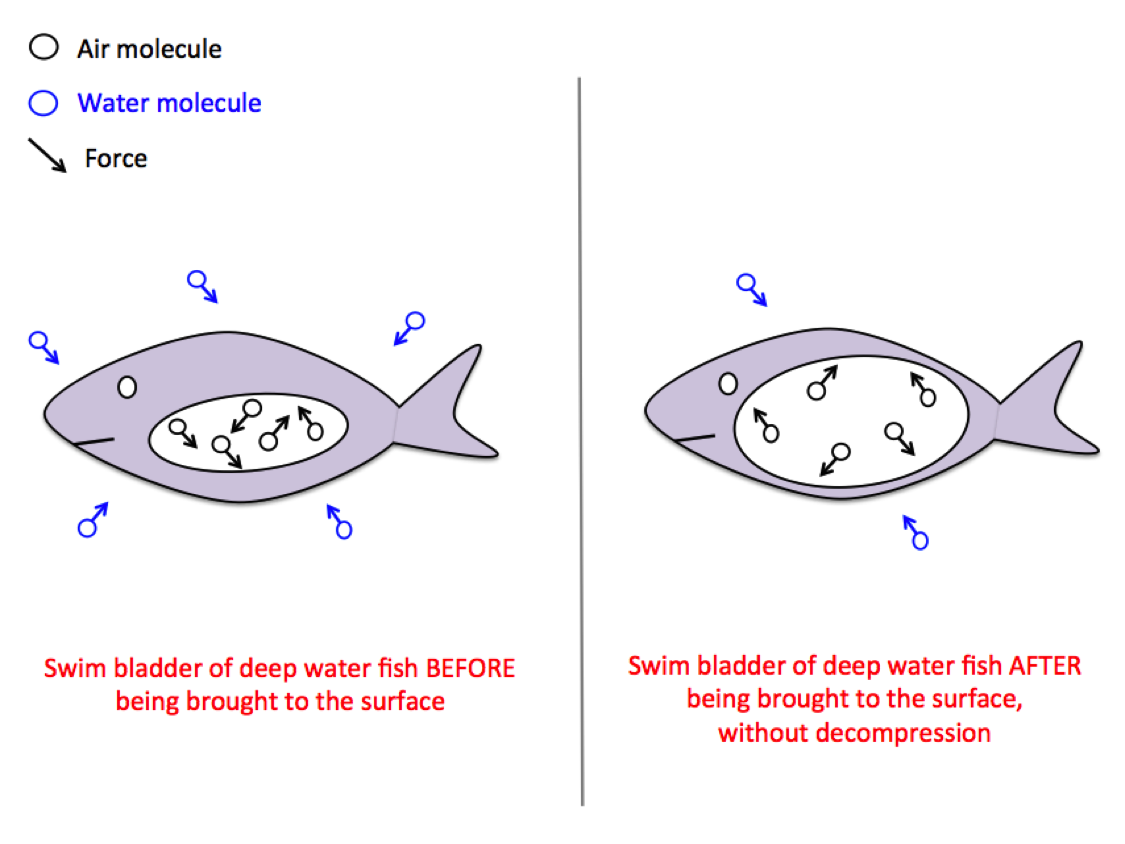
The fish that come up from the deep water of the “twilight zone” experience a similarly dramatic change in pressure. Many fish have a gas-filled organ, called a swim bladder, which helps fish to stay buoyant in the water. Fish that live deep in the ocean have swim bladders with a certain density of air inside them. When these fish are brought up from the deep water to the shallower water at the surface, the pressure exerted by the surrounding water on the swim bladder decreases quickly. There is no longer equilibrium between the pressure of the air inside the swim bladder and the surrounding water. The air inside the swim bladder presses out, similar to the way the air outside of the trash bag pushes in on your body.
Activity Instructions (for Educators)
NOTE: ADULT SUPERVISION STRONGLY SUGGESTED
- Show the materials to the class and explain that they will be exploring the concept of pressure in this activity.
- Ask for two volunteers: the first volunteer will sit inside the trash bag and the second volunteer will help to create the vacuum inside the bag.
- Have the first volunteer kneel or sit cross-legged inside the trash bag. Have the other volunteer help to bring the bag over their shoulders. The bag should come up to their neck, but not be tight around the neck. DO NOT COVER HEAD WITH GARBAGE BAG. The teacher should operate the vacuum cleaner.
- Instruct the volunteer inside the bag to hold the hose of the vacuum cleaner inside the bag, pointed away from their body, and to cup their hands around the vacuum-cleaner hose so the bag or their clothes don’t get sucked into the hose.
- Count down from 5 and turn on the vacuum cleaner.
- Observe the shrink-wrap process.
*Quick Tip: if the bag doesn't tightly shrink-wrap to the person inside the bag, have the second volunteer make sure that the opening of the bag is closed around the person’s body and that air is only moving through the vacuum cleaner hose, unobstructed by the bag or clothing. Students should feel a tight squeeze from the bag, but if they are uncomfortable, you can turn off the vacuum and the bag will immediately stop squeezing.
- Have as many students as possible experience the shrink-wrap process by sitting inside the bag.
- Once students have experienced or observed the shrink-wrap process, have them spend five minutes drawing a conceptual model that explains what they observed.
*Students should draw two pictures: the first should depict what’s happening before the vacuum cleaner gets turned on, and the second should show what’s happening after the vacuum cleaner is on and their body is shrink-wrapped.
*Encourage students to include labels, arrows or anything else that helps them illustrate what they observed.
- Have students partner up to discuss their conceptual models. Students should ask questions about their partner’s model and have a chance to respond to their partner’s questions. After discussing, give students time to revise their models and incorporate any new ideas that came from the discussion.
- After revising their models this first time, instruct students to display their drawings on their desks for a gallery walk. The purpose of the gallery walk is for the whole class to see all of the models, ask questions and provide feedback. To do this, distribute two colors of sticky notes:
*Color 1 = questions or clarifications about the model
*Color 2 = positive comments or agreement about the model
- Students should circulate through the classroom and comment on the models using the colored sticky notes.
- Have students return to their seats and read their notes. Give students a final chance to revise their models based on their peers’ comments or questions.
- Conclude the activity by leading a class discussion to explain the science of the shrink-wrap activity. To do this, you can draw a scientifically accurate model on the board. This is also the chance to address any misconceptions about what’s causing the bag to shrink-wrap. Some other guiding questions for the whole class discussion might include the following:
*Using a similar setup, what other ideas for experiments do students have?
*How is this activity related to the pressure change that a fish might feel when coming up from the “twilight zone”?
- Are you curious about what other people think about this phenomenon? Students can share their experiences with others all over the world by posting videos, photos or their models on the KQED website and see what others have posted here. Or share them with @KQEDedspace via Vine, Instagram or Twitter with the hashtag #kqedpressure.