Oral presentations can take many different forms in the ELL classroom—ranging from students briefly presenting their learning in small groups to creating a multi-slide presentation for the whole class. In this section, we give some general guidelines for oral presentations with ELLs. We then share ideas for helping students develop their presentation skills and describe specific ways we scaffold both short and long oral presentations.
We keep the following guidelines in mind when incorporating oral presentations into ELL instruction:
 Topic— It can be easier and more motivating for students speaking a new language to deliver presentations on topics they find meaningful and interesting. We try to give students opportunities to select their own topics as much as possible or to choose from a list of topics. It is also helpful for student presentations to be connected to a current unit of study. This enables them to apply new vocabulary, demonstrate their learning, and feel more confident in their knowledge.
Length—We have students develop and deliver short presentations (usually 2-4 minutes) on a regular basis so they can practice their presentation skills with smaller, less overwhelming tasks. These presentations are often to another student or a small group. Once or twice a semester, students do a longer presentation (usually 5-8 minutes), many times with a partner or in a small group.
Novelty—Mixing up how students present (in small groups, in pairs, individually) and what they use to present (a poster, a paper placed under the document camera, props, a slide presentation, etc.) can increase engagement for students and the teacher!
Whole Class Processing -- We want to avoid students “tuning out” during oral presentations. Not only can it be frustrating for the speakers, but students also miss out on valuable listening practice. During oral presentations, and in any activity, we want to maximize the probability that all students are thinking and learning all the time. Jim Peterson and Ted Appel, administrators with whom we’ve worked closely, call this “whole class processing” (Ferlazzo, 2011, August 16) and it is also known as active participation. All students can be encouraged to actively participate in oral presentations by being given a listening task-- taking notes on a graphic organizer, providing written feedback to the speaker, using a checklist to evaluate presenters, etc.
Language Support—It is critical to provide ELLs, especially at the lower levels of English proficiency, with language support for oral presentations. In other words, thinking about what vocabulary, language features and organizational structures they may need, and then providing students with scaffolding, like speaking frames and graphic organizers. Oral presentations can also provide an opportunity for students to practice their summarizing skills. When students are presenting information on a topic they have researched, we remind them to summarize using their own words and to give credit when using someone else’s words.
Technology Support—It can’t be assumed that students have experience using technology tools in presentations. We find it most helpful using simple tools that are easy for students to learn (like Powerpoint without all the “bells and whistles” or Google Slides). We also emphasize to students that digital media should be used to help the audience understand what they are saying and not just to make a presentation flashy or pretty. We also share with our students what is known as “The Picture Superiority Effect”-- a body of research showing that people are better able to learn and recall information presented as pictures as opposed to just being presented with words (Kagan, 2013).
Groups-- Giving ELLs the opportunity to work and present in small groups is helpful in several ways. Presenting as a group (as opposed to by yourself) can help students feel less anxious. It also offers language-building opportunities as students communicate to develop and practice their presentations. Creating new knowledge as a group promotes collaboration and language acquisition--an ideal equation for a successful ELL classroom!
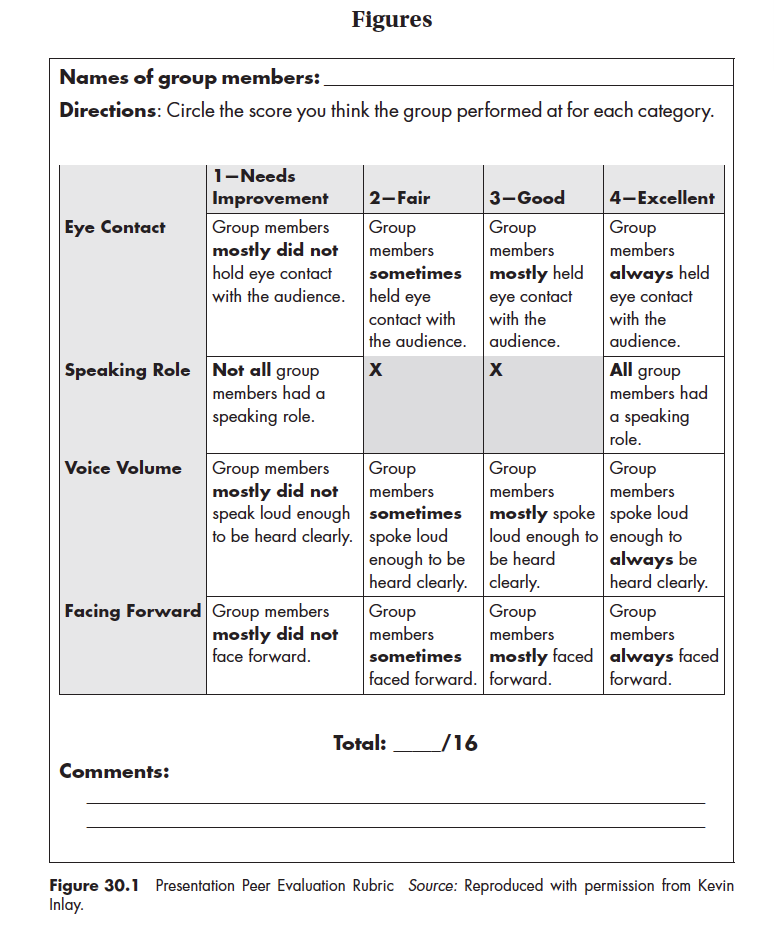
Teacher feedback/student evaluation--The focus of oral presentations with ELL students should be on the practice and skills they are gaining, not on the grade or “score” they are earning. Teachers can give out a simple rubric before students create their presentations. Then students can keep these expectations in mind as they develop and practice their presentations. The teacher, or classmates, can then use the rubric to offer feedback to the speaker. We also often ask students to reflect on their own presentation and complete the rubric as a form of self-assessment. Figure 30.1 – “Presentation Peer Evaluation Rubric”, developed by talented student teacher Kevin Inlay (who is now a teacher in his own classroom), is a simple rubric we used to improve group presentations in our ELL World History class.
Teaching Presentation Skills
We use the following two lesson ideas to explicitly teach how to develop effective presentation skills:
LESSON ONE: Speaking and Listening Do’s and Don’ts
We help our students understand and practice general presentation skills through an activity we call Speaking and Listening “Do’s and Don’ts.” We usually spread this lesson out among two class periods.
We first ask students to create a simple T-chart by folding a piece of paper in half and labeling one side “Do” and the other side “Don’t.” We then post Figure 30.2 “Speaking Do’s and Don’ts” on the document camera and display the first statement (the rest we cover with a blank sheet of paper).
We read the first statement, “Make eye contact with the audience,” and ask students if this is something they want to do when they are giving a presentation or if it is something they don’t want to do. Students write the statement where they think it belongs--under the “Do” column or “Don’t” Column. Students then share their answer with a partner and discuss why they put it in that column. After calling on a few pairs to share with the class, we move down the list repeating the same process of categorizing each statement as a “Do” or a “Don’t.” Students write it on their chart and discuss why it should be placed there.
After categorizing the statements for speaking, we give students Figure 30.3 “Listening Do’s and Don’ts.” We tell students to work in pairs to categorize the statements as something they do or something they don’t want to do when listening to a student presentation. This time, we ask students to make a quick poster with the headings “Do’s” and “Don’ts” for Listening. Under each heading students must list the corresponding statements--the teacher can circulate to check for accuracy. Students are asked to talk about why each statement belongs in each category and should be prepared to share their reasoning with the class. Students must also choose one “do” statement and one “don’t” statement to illustrate on their poster. Students can present their posters in small groups or with the whole class. This serves as a great opportunity to apply the speaking and listening “do’s” they just reviewed and heightens their awareness of the “don’ts!”
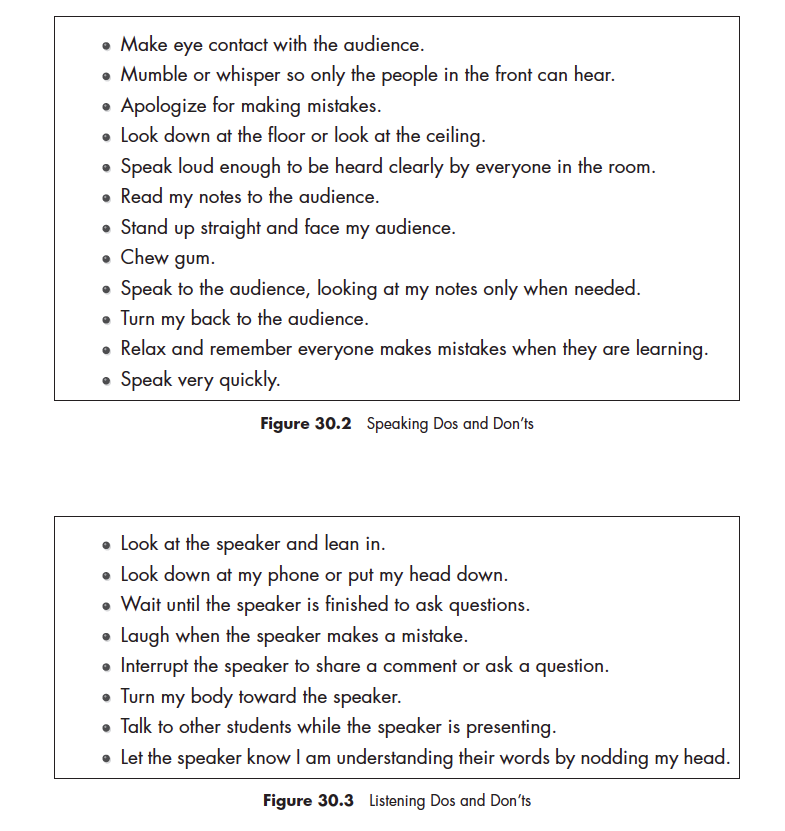
A fun twist, that also serves as a good review on a subsequent day, is to ask groups of students to pick two or three “do’s” and “don’ts” from both Speaking and Listening to act out in front of the class.
LESSON TWO Slide Presentations Concept Attainment
We periodically ask students to make slide presentations using PowerPoint or Google Slides to give them practice with developing visual aids (see the Home Culture activity later in this section). We show students how to make better slides, along with giving students the language support they may need in the form of an outline or sentence starters. An easy and effective way to do this is through Concept Attainment.
Concept Attainment involves the teacher identifying both "good" and "bad" examples of the intended learning objective. In this case, we use a PowerPoint containing three “good” slides and three “bad” ones (see them at The Best Resources For Teaching Students The Difference Between A Good and a Bad Slide).
We start by showing students the first example of a “good” or “yes” slide (containing very little text and two images) and saying, “This is a yes.” However, we don’t explain why it is a “yes.” Then we show a “bad” or “no” example of a slide (containing multiple images randomly placed with a very “busy background”), saying, “This is a no” without explaining why. Students are then asked to think about them, and share with a partner why they think one is a "yes" and one is a "no."
At this point, we make a quick chart on a large sheet of paper (students can make individual charts on a piece of paper) and ask students to list the good and bad qualities they have observed so far. For example, under the “Good/Yes” column it might say “Has less words and the background is simple” and under the “Bad/No” column “Has too many pictures and the background is distracting.”
We then show the second “yes” example (containing one image with a short amount of text in a clear font) and the “no” example (containing way too much text and using a less clear font style). Students repeat the “think-pair-share” process and then the class again discusses what students are noticing about the “yes” and “no” examples. Then they add these observations to their chart.
Students repeat the whole process a final time with the third examples. The third “yes” example slide contains one image, minimal text and one bullet point. The third “no” example, on the other hand, contains multiple bullet points.
To reinforce this lesson at a later date, the teacher could show students more examples, or students could look for more “yes” and “no” examples online. They could continue to add more qualities of good and bad slides to their chart. See the Technology Connections section for links to good and bad PowerPoint examples, including the PowerPoint we use for this Concept Attainment lesson.
You can learn more about other presentations that support public speaking, such as home culture presentations, speed dating, talking points, top 5 and PechaKucha Book talks in our book, “The ELL Teacher’s Toolbox: Hundreds of Practical Ideas to Support Your Students.”

Larry Ferlazzo has taught English Language Learners, mainstream and International Baccalaureate students at Luther Burbank High School in Sacramento for 15 years. He has authored eight books on education, hosts a popular blog for educators, and writes a weekly teacher advice column for Education Week Teacher. He was a community organizer for 19 years prior to becoming a high school teacher.