upper waypoint

Preserve the Bounty of Spring Produce with Homemade Pickled Vegetables

Save ArticleSave Article
Failed to save article

Please try again

Transforming spring vegetables into pickles is a great way to preserve their flavor for the coming year. Photo: Kate Williams

Canning is often thought of as a summertime activity, what with the bounty of fruits and tomatoes sure to head our way in a few short months. Yet the humbler spring produce now showing its face at farmers’ markets is still a fine—nay, great—object for preservation. I wouldn’t suggest trying to sort out asparagus jam, but these green stalks, as well as their seasonal friends, make glorious pickles. I like to stuff as many different spring goodies as I can get my hands on into a few good canning jars in order to save them for less exciting times (like, say, January). I’d suggest you do the same. Here’s how:

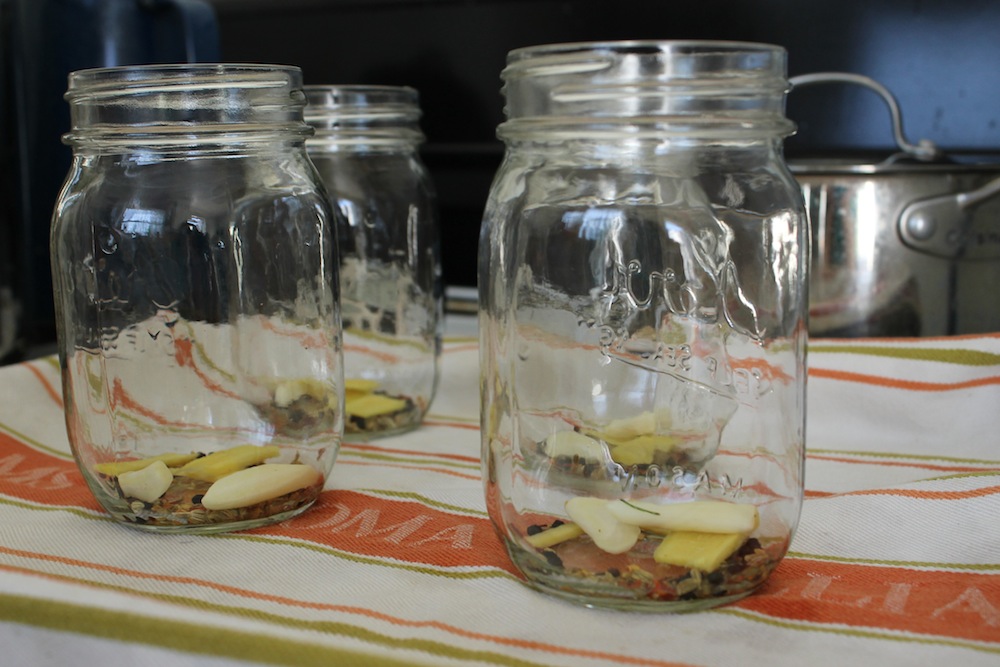
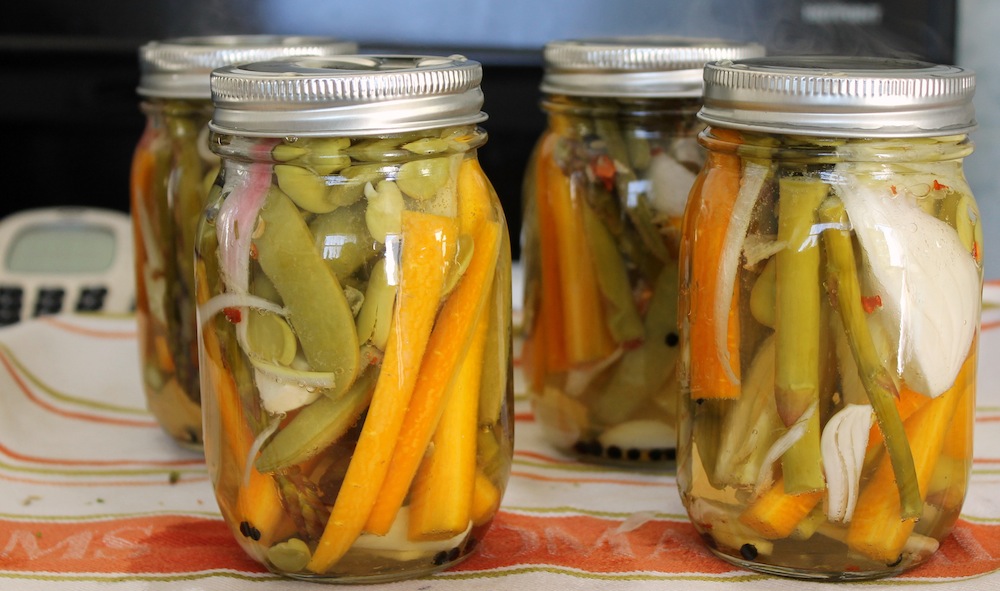
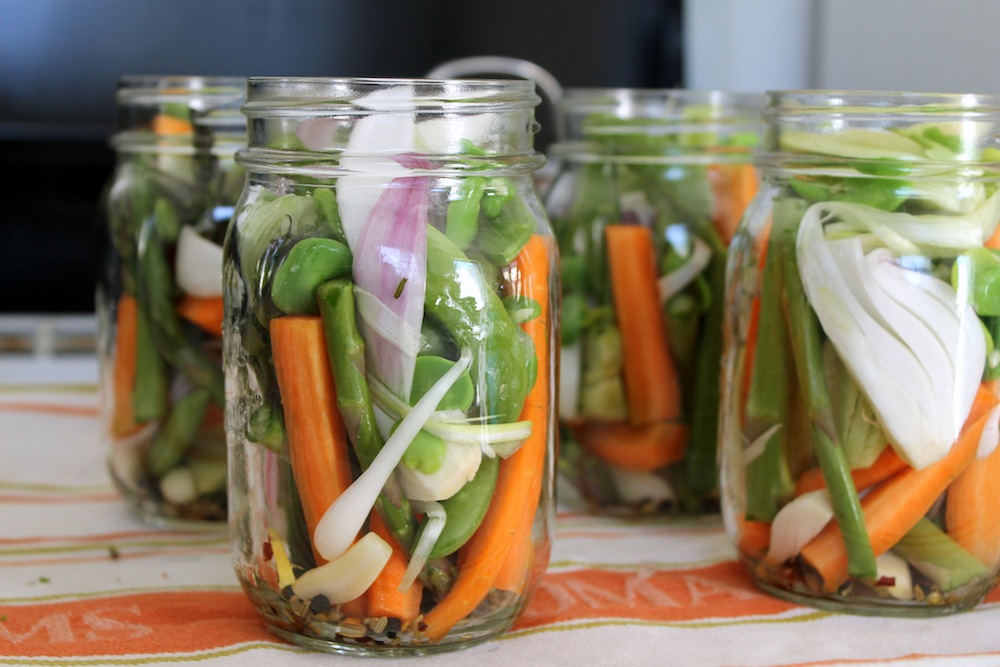
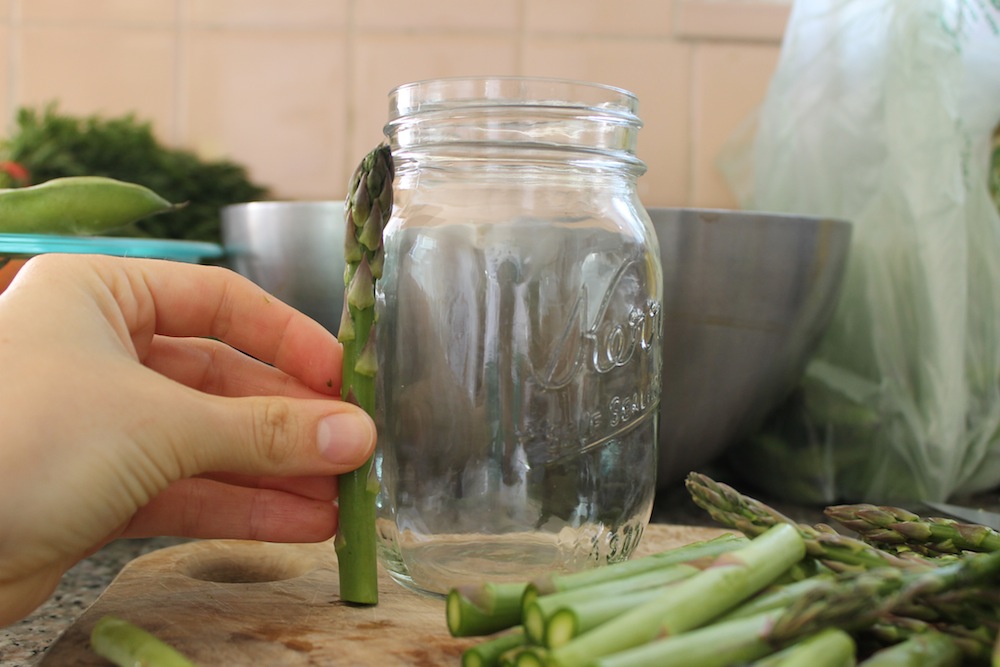
Before getting to work on the vegetables, it’s a good idea to prepare your jars for canning. I like to make pickles in pint jars because they’re big enough to hold sizable pickles, but they’re not so large that the pickles will go bad before you eat up the entire contents of the jar. (If you choose to use a larger jar, you will need to process the pickles an additional 5 minutes in the boiling water bath.)

Bring jars to a rapid boil for at least 10 minutes in order to sterilize before adding the pickles. Photo: Kate Williams

Glass canning jars need to be boiled for at least 10 minutes in order to be considered sterile. For some canning projects, the items being processed in the boiling water bath will be in the water for 10 minutes or more; in those cases, the jars wouldn’t need to be sterilized. These pickles, however, only need 5 minutes in the boiling water bath in order to be shelf-stable, so it will be necessary to sterilize the jars before canning. To do so, place 4 pint jars on the rack of a canning pot or large stockpot and cover completely with water. Bring this water up to a full, rolling boil. Once it hits a boil, start your 10 minute timer. After the allotted time, turn the heat down to low, cover the pot, and let the jars sit in the hot water until you’re ready for them. They will remain sterile as long as they stay hot and submerged. To soften and sterilize the lids and bands, place four new lids and the accompanying bands in a medium-sized bowl. Ladle over some of the boiling water to cover. Let them sit until the vegetables and brine are ready.

You can pickle whichever spring vegetables look best at the market. Photo: Kate Williams

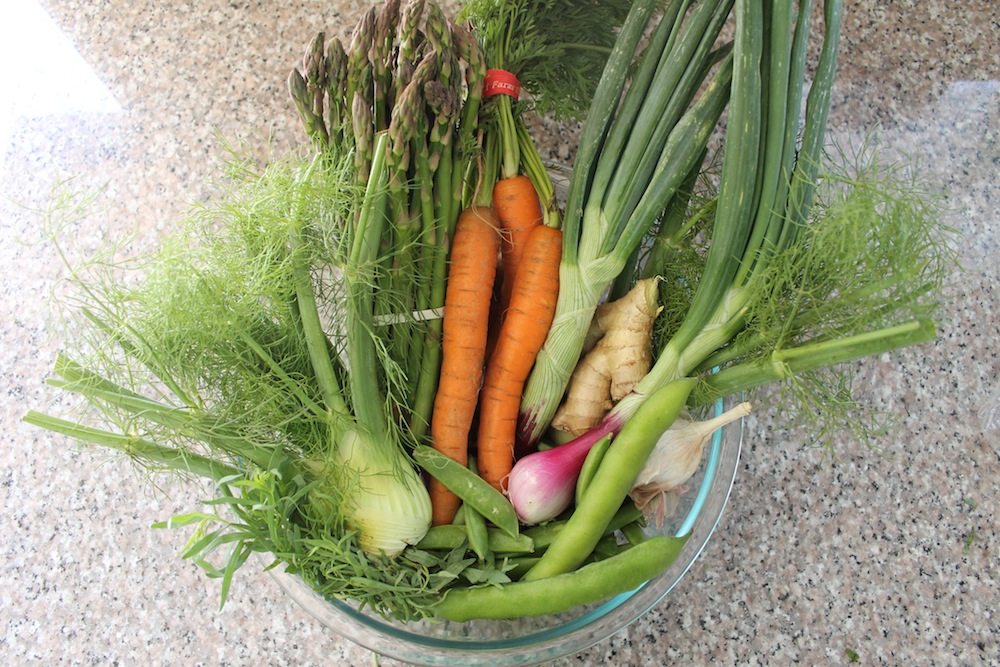
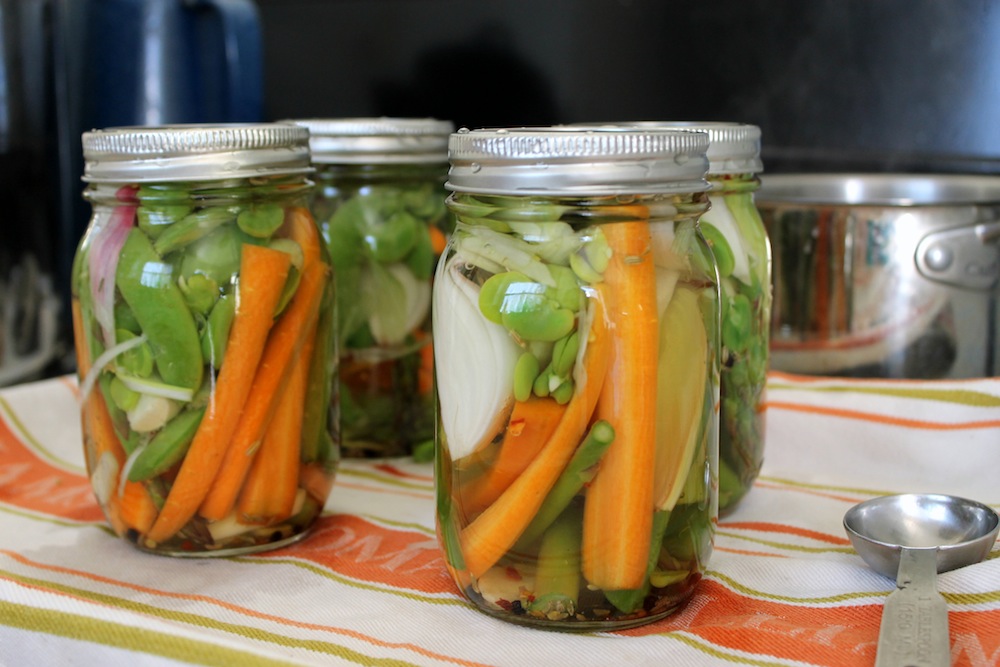
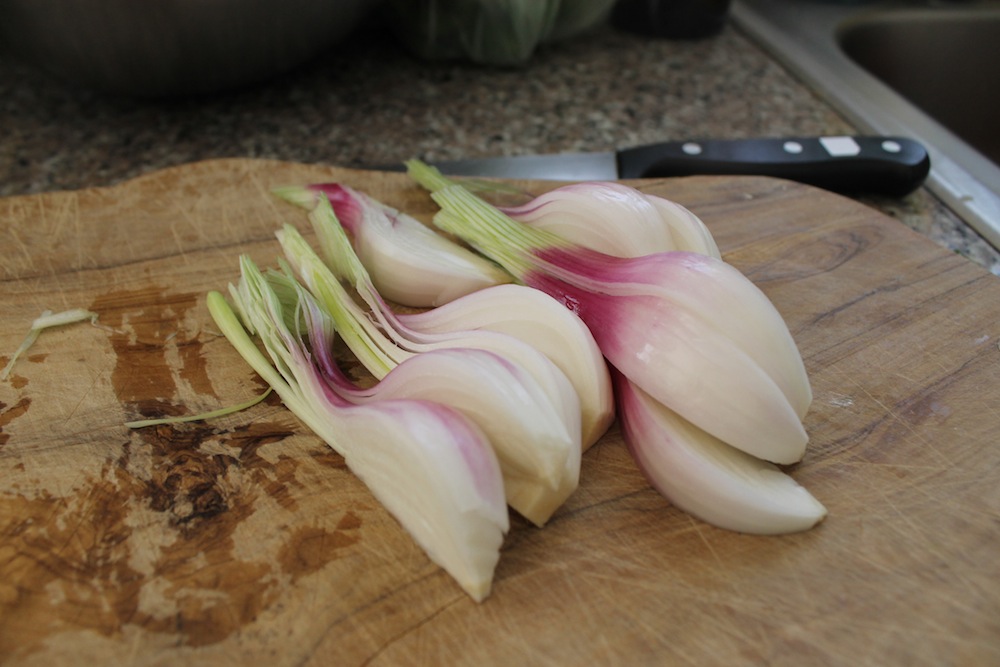
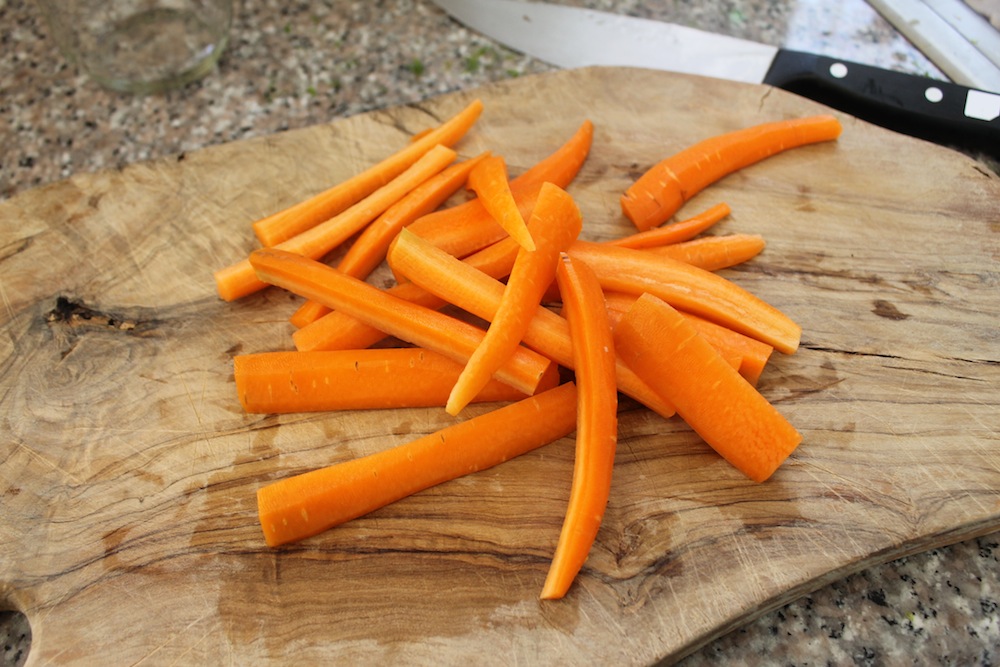
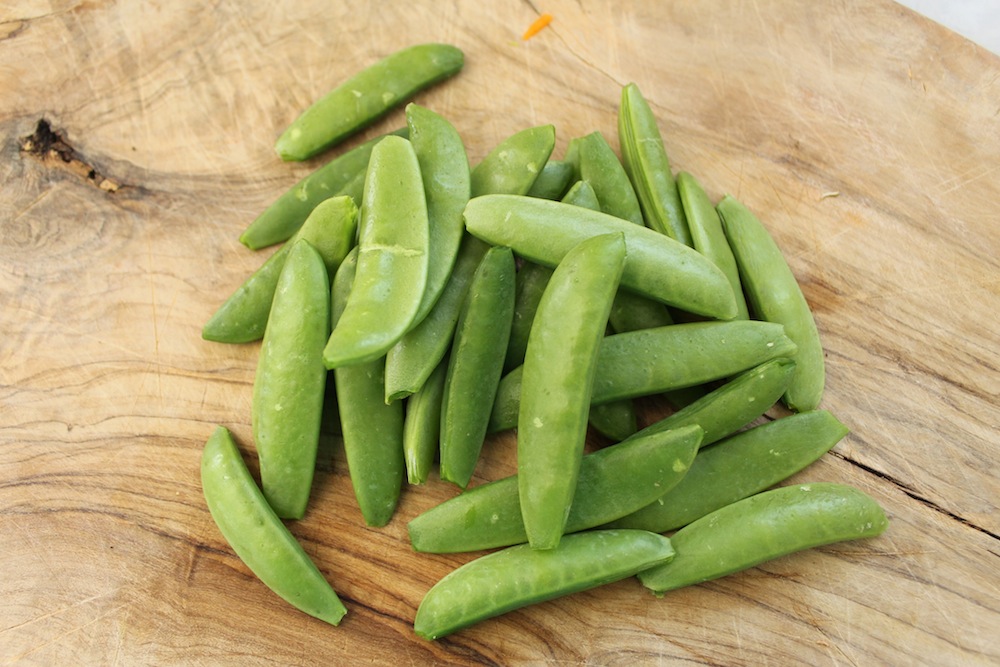
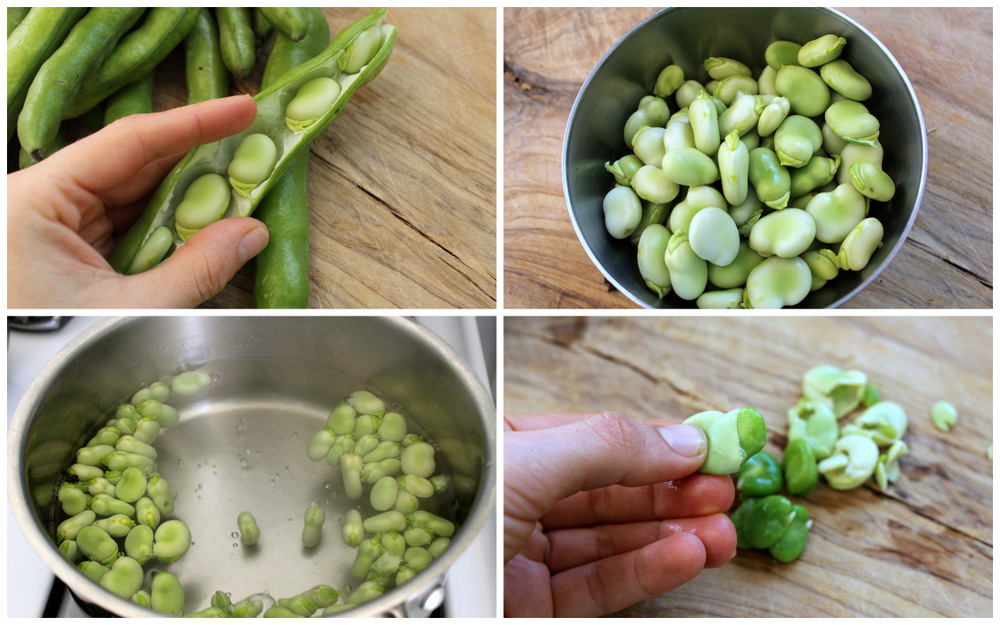
While you’re waiting for the jars to boil, get to work on the vegetables. You’ll need around 2 pounds of ready-to-eat vegetables for four pints of pickles. This means you’ll likely need to buy 2 1/2 to 3 pounds of whatever looks wonderful and fresh. Here, I’m using spring onions, carrots, fennel, asparagus, fava beans, and sugar snap peas. Depending on the vegetable, you’ll need to give it more or less attention. You can cut vegetables into any shape you’d like, but make sure to cut the vegetables into comparable sizes to ensure that they’ll pickle at the same rate. Also be sure to slice long vegetables, like carrots and asparagus, into thin spears so that they will fit upright in the jars. Take a look below to see how I’ve prepped by future pickles:

Spring onions should be trimmed of the dark green sections and sliced into 1/2-inch wide wedges. Photo: Kate Williams
Carrots should be peeled or well-scrubbed and sliced into batons around 1/4-inch thick and 3 to 4 inches long. Photo: Kate Williams
Fennel should be trimmed of the stems, scrubbed, and sliced into wedges 1/4- to 1/2-inch thick. Photo: Kate Williams
Asparagus should be trimmed of its tough base and cut into pieces that are 3 to 4 inches long. Photo: Kate Williams
Sugar snap peas should have their tops and tails removed, as well as any tough strings. Photo: Kate Williams
Fava beans require a bit more work. Shuck the beans from the pod, and collect in a bowl. Bring a small saucepan of salted water to a boil, and add shucked beans. Let boil until the beans start to turn bright green, about 1 minute. Drain and immediately rinse under cold water. Using your fingers, squeeze out the tender center from the tough skin. Photo: Kate Williams

Next, prepare the brine. When I’m making pickles or other preserved foods, I like to think about the flavor accents that I would use if I were to say, sauté, these vegetables instead of pickling them. One of my favorite spring herbs is tarragon, which I like to pair with fennel seeds, garlic, ginger, and chile flakes.

Sponsored

To translate this palate to a pickle brine, I use a couple of tricks: First, I steep the fresh herbs in the hot brine, and then remove them before pickling. Why? Fresh herbs have a tendency to turn slimy and dark if they sit in vinegar for too long. Steeping allows me to add flavor without compromising the aesthetic of the pickle. Second, I add the spices and garlic directly to the sterilized jars before pouring in the brine. I’ve found that when spices are added to a brine and then poured over pickles, the spices have a tendency to clump together and not distribute evenly in the jars. We’ll return to these spices in a moment.

Bundle 2 cups of tarragon leaves and stems in cheesecloth to make it easy to remove from the brine. Photo: Kate Williams

To make it easier to remove the tarragon from the brine, I like to tie up the leaves in cheesecloth. You could also strain the herbs out of the brine using a sieve if you don’t have cheesecloth. I like to use a lot of tarragon (2 whole cups of leaves and stems), but feel free to scale back if you don’t want quite the same intensity of flavor. Place the tarragon leaves and stems in the center of a large piece of cheesecloth. Bring the corners of the cheesecloth together and tie the cheesecloth into a bundle around the tarragon using kitchen twine.

Bring the brine to a boil, cover, and let the mixture steep off the heat to infuse with tarragon flavor. Photo: Kate Williams

Now I build the brine by combining 3 cups each of champagne vinegar (you could also use white wine vinegar) and water in a saucepan with 6 tablespoons each of sugar and salt. I get this heating and add the tarragon bundle. Once the mixture comes to a boil, remove the pot from the heat and let the brine steep for 5 to 10 minutes. Taste as you go, and remove the tarragon once you’ve reached the optimum flavor. Keep the pot covered so that the brine remains hot.

Once your brine is ready, remove the jars from the canning pot. Work slowly and carefully (I like to use a long pair of tongs) to let the water drain out of the jars and back into the pot. Place the jars on a towel-lined section of the counter or on a towel-lined baking sheet. Cover the canning pot and return the heat to high to bring it back up to a boil.

I like to place the spices into the jars before adding the vegetables and brine to ensure that they are evenly distributed. Photo: Kate Williams

Into the bottom of the hot jars go the spices. In each jar, I like to use 1 clove of garlic and a few slices of ginger, plus 1/4 teaspoon each of black peppercorns and fennel seeds, and a pinch of red pepper flakes. Next, add the vegetables. Try and place an equal amount of each vegetable in each jar, packing them in as tightly as possible. All of the vegetables will shrink when the jars are boiled, so be sure to cram in as many pieces as you can. Finally, top the vegetables with the hot brine. Be sure to leave 1/2 inch of headspace between the top of the brine (and vegetables) and the top of the jar. This headspace will allow for the expansion of the liquid and prevent the jars from breaking when they are boiled. Try to work quickly while packing the jars; you want the jars to still be hot when you are finished.

Pack the vegetables into the jars as tightly as possible, as they will shrink upon processing. Photo: Kate Williams

Add the lids and bands, screwing them shut just until they are closed. (This is called “finger-tip tight.”) You will want air to be able to escape the jars as they boil to create a vacuum inside of the jars. If the lids are screwed on too tightly, the jars may break. Now transfer the jars back to the pot and bring the water back up to a rolling boil. Do not start timing until the water is fully boiling. Sometimes, air bubbles escaping from the jars will make the water appear as though it is boiling; wait until you can see the bubbling from the bottom of the pot. Let the jars boil for a full 5 minutes, and then remove them from the pot, placing them back on the towel-lined counter.

The lids should start to ping and seal within a few minutes. Still, it is a good idea to let the jars rest undisturbed until they are fully cooled before handling. Once they’re cool, you can remove the bands and store them at room temperature for up to 1 year. If any of the jars fail to seal, store them in the fridge.

My favorite way to serve these pickles is standing at the counter, straight out of the jar, but they’d also pair well with fresh or lightly aged goat cheese and a slice of salami or two.

Homemade spring vegetable pickles. Photo: Kate Williams

Recipe: Homemade Spring Vegetable Pickles

Makes 4 pints

Sponsored

Note: I find it easiest to weigh the produce after it has been prepared for pickling. Depending on the vegetable, it might need to be peeled or shucked ahead of time. Try to cut vegetables into similar sizes to ensure that they will pickle at the same rate. Long vegetables, such as carrots and asparagus, should be cut to fit into jars vertically.

    Ingredients:
  • 2 1/2 to 3 pounds seasonal vegetables, such as asparagus, carrots, spring onions, fava beans, and sugar snap peas
  • 2 bunches tarragon (about 2 cups of leaves and stems)
  • 3 cups champagne or white wine vinegar
  • 3 cups water
  • 6 tablespoon granulated sugar
  • 6 tablespoons kosher salt
  • 4 garlic cloves, halved
  • 1 teaspoon whole black peppercorns
  • 1 teaspoon fennel seeds
  • 1 (1-inch piece) fresh ginger, peeled and sliced thin
  • 1/4 teaspoon red pepper flakes
    Equipment:
  • 1 large canning pot with rack
  • 4 glass canning pint jars with new lids and bands
  • Scale
  • Cheesecloth
  • Kitchen twine
  • Medium saucepan
  • Canning tongs
  • Canning funnel
  • Kitchen towel
    Instructions:
  1. Place 4 glass pint jars in a large canning pot fitted with a canning rack and add water to cover the tops of the jars by 1 inch. Bring the water to a rapid boil over high heat. Boil the jars for at least 10 minutes to sterilize. After 10 minutes, reduce the heat to low, cover the pot, and let the jars sit in the hot water until the vegetables and brine are ready.
  2. Place the lids and bands in a medium bowl and ladle over some of the boiling water to cover. Let sit until the vegetables and brine are ready.
  3. While the jars are being sterilized, peel, shuck, and/or slice vegetables as needed to fit into jars. See above photographs for examples. You will need 2 pounds of prepped vegetables for the pickles. Save any extras for snacking.
  4. Place tarragon leaves and stems in the center of a large piece of cheesecloth. Bring the corners of the cheesecloth together and tie the cheesecloth into a bundle around the tarragon using kitchen twine.
  5. Combine the vinegar, water, sugar, and kosher salt in medium saucepan. Add the tarragon bundle. Bring the mixture to a boil, cover, and remove from the heat. Let brine steep until desired tarragon flavor is reached, 5 to 10 minutes. Remove tarragon bundle, squeezing the cheesecloth over the saucepan to remove any excess water. Cover the saucepan to keep warm and set aside.
  6. Carefully remove the sterilized jars from the canning pot, allowing the water inside of the jars to fall back into the pot. Re-cover the pot and return the heat to high. Place the jars on a kitchen towel-lined counter or sheet pan. Working quickly (you want to pack the jars while they are still hot), divide garlic, peppercorns, fennel seeds, ginger, and red pepper flakes between the jars.
  7. Pack the vegetables into the jars, fitting as many vegetables in as possible. They will shrink upon canning. Using the canning funnel, pour the hot brine over the pickles, leaving 1/2 inch headspace. Place the lids on the jars and screw the bands on until they are just closed (“finger-tip tight”).
  8. Using canning tongs, place the jars back into the canning pot. If it is not already boiling, bring the water back to a rolling boil.
  9. Once the water has reached a full boil, set a timer for 5 minutes. After 5 minutes at a rolling boil, remove the jars from the pot and set back down on to the towel-lined counter. Let the jars cool completely before removing the bands and storing. If any jars fail to seal, store them in the fridge.

lower waypoint
next waypoint
Samosas aren’t from India…Wait, what?Food Labeling: How to Identify Conventional, Organic and GMO ProduceSpringtime Delight: Rhubarb Puff-Tart PocketsCheck, Please: How to Pay without looking like a fool or making everyone uncomfortable.Josey Baker Bread: Baking for Bros, with Gluten-Free Adventure Bread RecipeBay Area Bites Guide to 8 Great Places to Buy Fresh FishBored of Apples and Walnuts? Try Adding Date Charoset to Your Passover Table This YearDIY Bone Broth - You Really Should be Making It at HomeFromage de Chat (aka Cat Milk Cheese)Taste Test: Store-bought Raw Sauerkrauts are Surprisingly Distinctive