upper waypoint

DIY Kimchi: Easy to Make It Your Own

Save ArticleSave Article
Failed to save article

Please try again

Vibrant, spicy kimchi is simple to make at home and endlessly versatile. Photo: Kate Williams

It is easy to be intimidated by kimchi. Sit down at most any Korean restaurant and you will likely be greeted by an array of spicy pickled vegetables, some so unfamiliar in taste that you can’t imagine attempting to make them yourself.

Forget that negative thought. Kimchi is actually quite easy to make at home, and even easier to personalize once you’ve learned the basics. I like to make kimchi-style pickles out of just about anything. Napa cabbage and daikon radish are the most familiar, but kimchi can be made from anything from cucumbers to Brussels sprouts. Lest you think these variations skew too far from tradition, remember that kimchi is simply a Korean method of fermentation. There is an entire museum in Seoul dedicated to the myriad kimchis that exist and existed over the coarse of Korea’s history.

Winter is the perfect time to ferment a batch or two of kimchi. Cabbage and root vegetables are abundant, and the cooler (emphasis on the “er”) temperatures mean that fermentation won’t progress too quickly.

I like to equal parts of bok choy and napa cabbage in my kimchi. I cut each into 2-inch pieces. Photo: Kate Williams

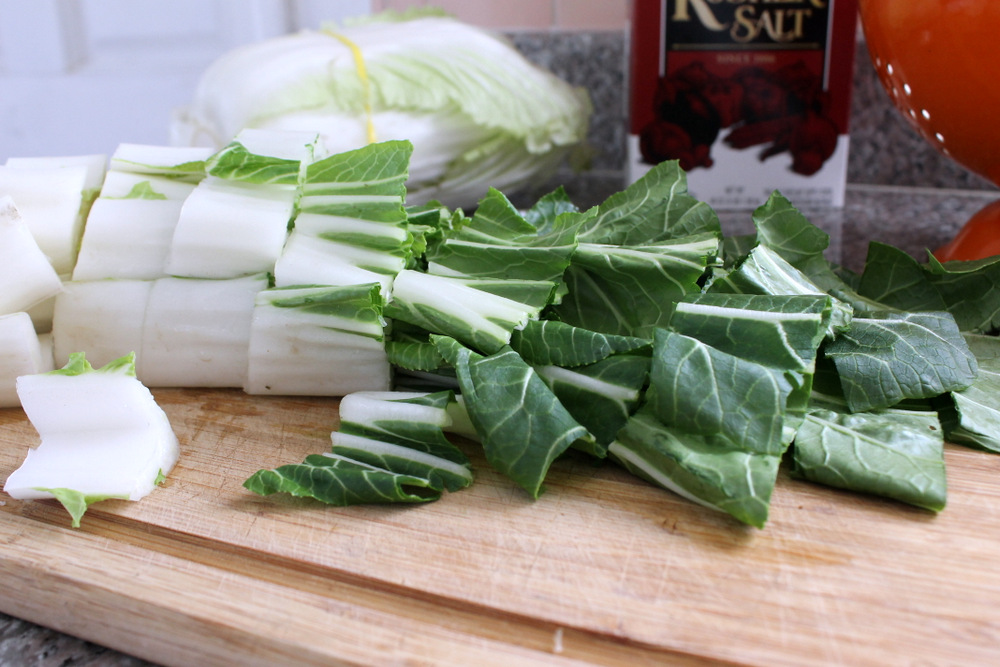
I like to start with a 50/50 blend of bok choy (the mature heads, not the tender baby bulbs) and Napa cabbage. One head of bok choy equals about a half a head of Napa. If the extra cabbage bothers you, simply double the recipe. I chop the leaves into large, 2-inch pieces, and then rub them with a generous 2 tablespoons of kosher salt. This salt rub accomplishes a few things: it draws moisture out of the cabbage and bok choy, seasons the leaves, and it serves as protection from any “bad” bacteria that could inoculate the vegetables once fermentation begins.* I let the salted leaves rest until the leaves soften and release at least 1/2 cup of liquid. It’ll take an hour or two.

My chili paste includes, from top left and moving clockwise, Korean kochukaru chili flakes, sliced ginger, chopped Asian pear, scallion whites, salted shrimp, and whole garlic cloves. Photo: Kate Williams

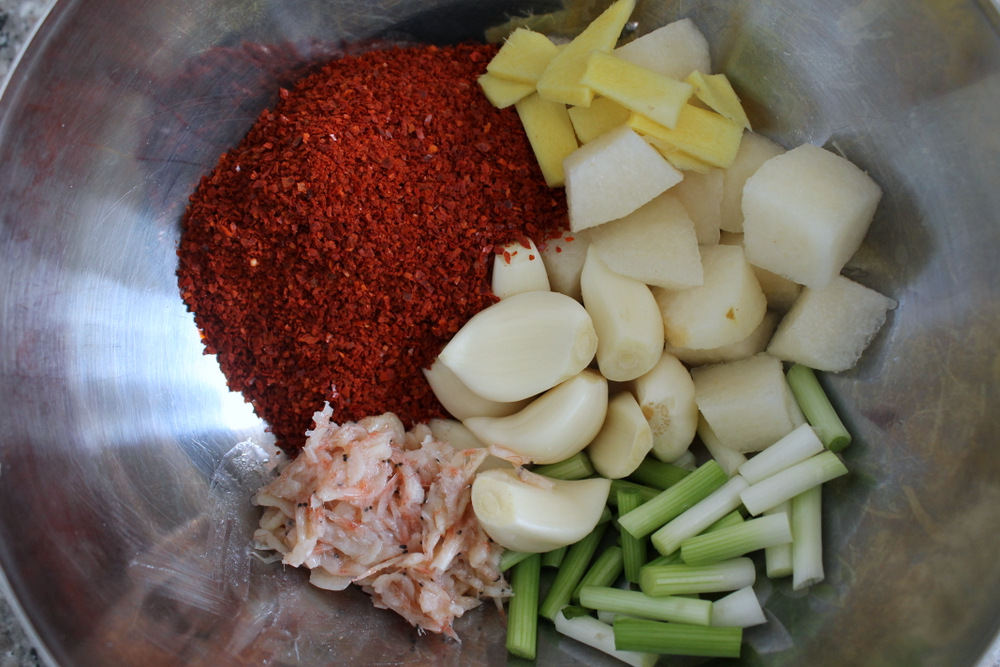
While the bok choy and cabbage are resting, I prepare the remaining ingredients. First up: chili paste. This fiery, potent blend of kochukaru (Korean chili flakes), ginger, garlic, and fermented seafood is the heart of kimchi, providing catalysts for fermentation. Proportions and the choice of ingredients will vary from kimchi maker to kimchi maker; I like to make a relatively mild chili paste for a versatile finished kimchi. It is certainly possible to make vegan kimchi if you’d like. Good, umami-rich substitutions for the salted shrimp include miso, soy sauce, and ground seaweed.

I use a food processor to puree the potent mix into a thick paste. Photo: Kate Williams

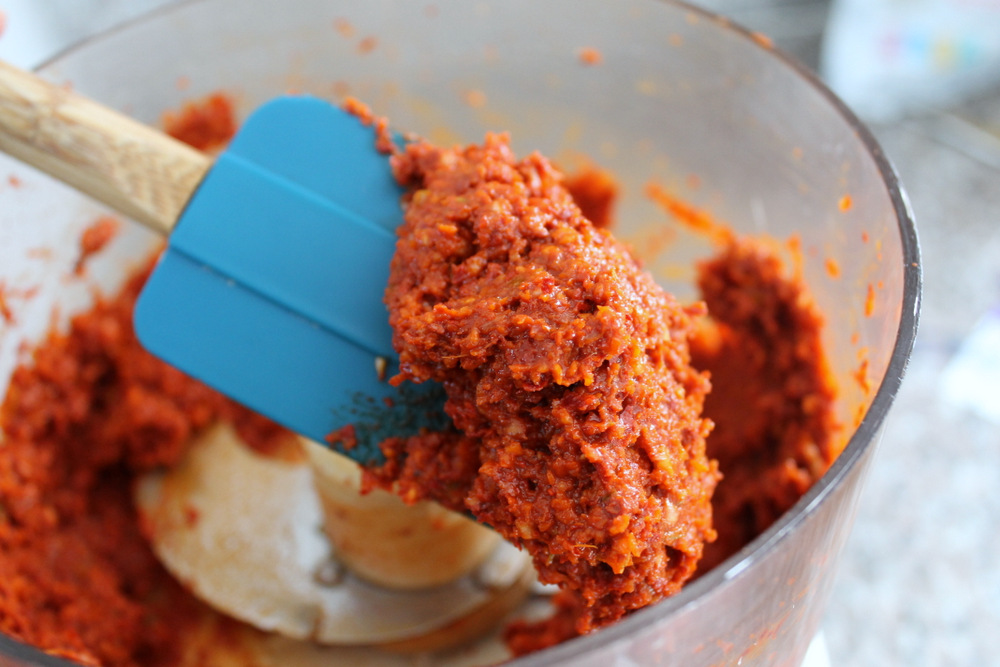
For my chili paste, I process a full head’s worth of peeled garlic cloves, about an inch of fresh ginger, 1/2 cup of kochukaru, and 2 tablespoons of salted shrimp (those little pink shrimp found in massive jars at Korean supermarkets) in my food processor with about 1/4 of an Asian pear (for natural sweetness) and the white ends of a bunch of scallions. Traditionalists can use a mortar and pestle if they desire. I let the whole mess whir in the food processor until a thick, homogenous paste forms.

To add variety to my kimchi, I’ve added carrots, daikon radish, watermelon radish, and scallion greens. Photo: Kate Williams

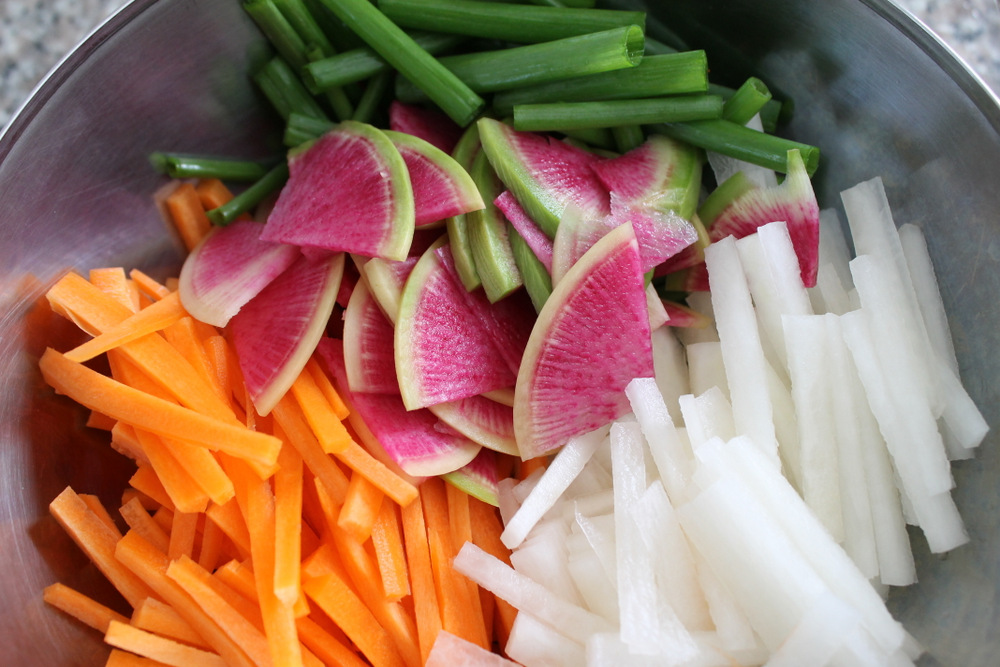
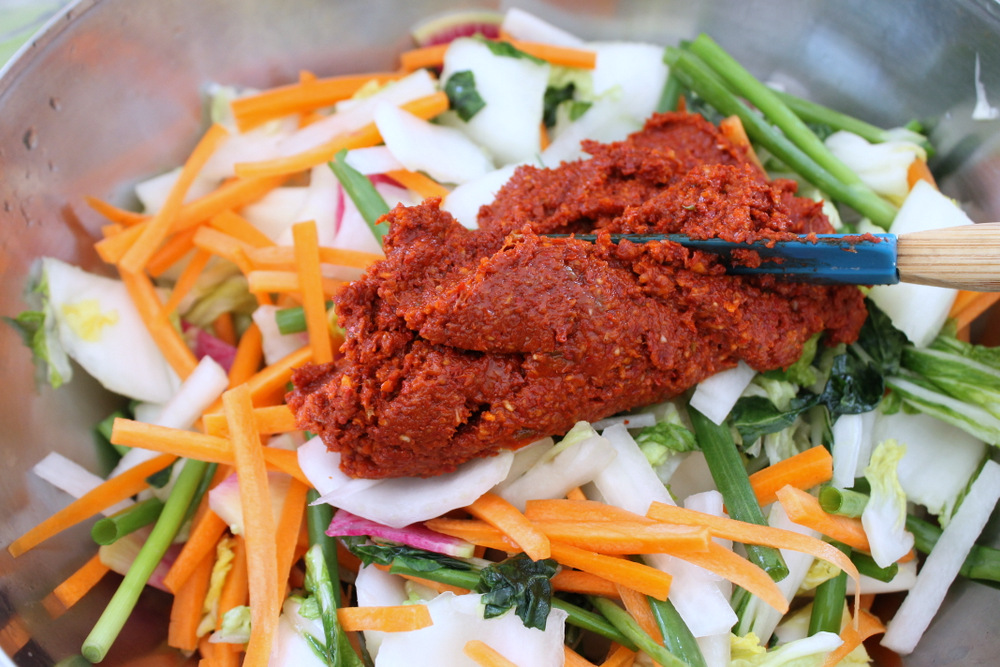
Next, I chop the remaining kimchi ingredients. Here I look for whatever crisp, crunchy vegetables that are available at the market. For this kimchi, I’m using carrots, daikon radish, watermelon radish, and the greens from that bunch of scallion whites that went into the chili paste. I julienned the carrots and daikon, which is simply the fancy way of saying that I cut them into thin, 2-inch long strips, cut the watermelon radish into thin wedges, and cut the scallion greens into 2-inch long pieces. You can, of course, modify this list with your favorite vegetables. Use around 1 to 1 1/2 cups of each chopped vegetable.

Be sure to wear rubber gloves while massaging the chili paste into the vegetables. Photo: Kate Williams

Once the bok choy and cabbage mixture has softened, I drain the leaves while reserving the extruded liquid. I mix the wilted leaves with the remaining chopped vegetables in a large bowl. Then I put on my handy rubber gloves. The first time I made kimchi, I mixed the chili paste into the cabbage with my bare hands. Big mistake. My hands burned with the fire unleashed by the capsaicin in the chili powder. Rubber gloves may not look cool, but they’re the only way to prevent chili burns. Gloves in place, add the chili paste to the vegetables and massage it into the vegetables. Make sure to coat all of the vegetables evenly.

Firmly pack the vegetables into a large glass jar. Caption: Kate Williams

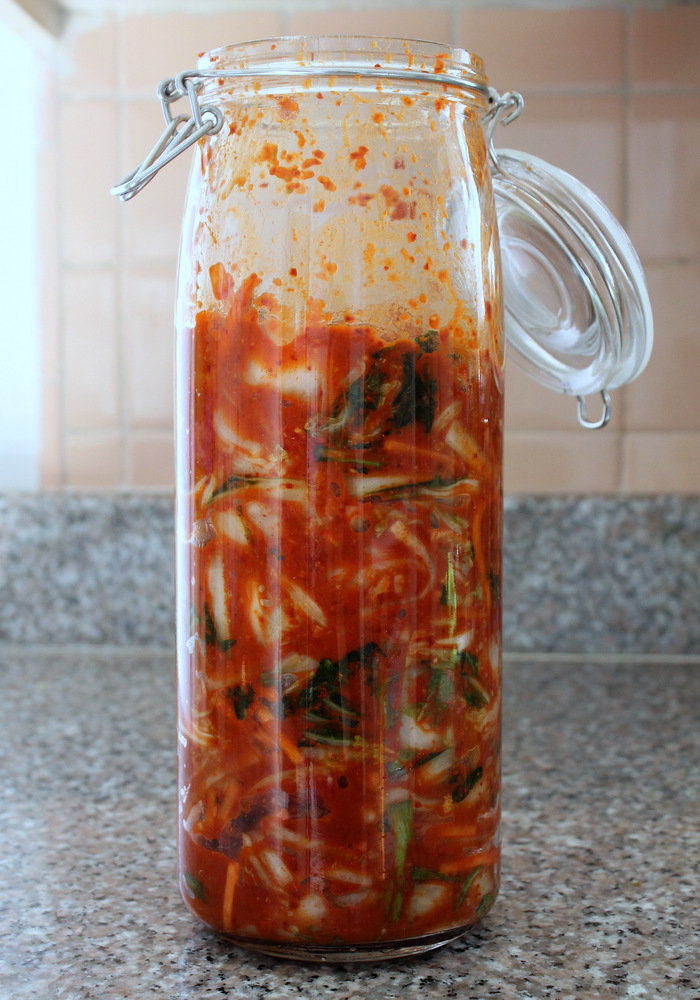
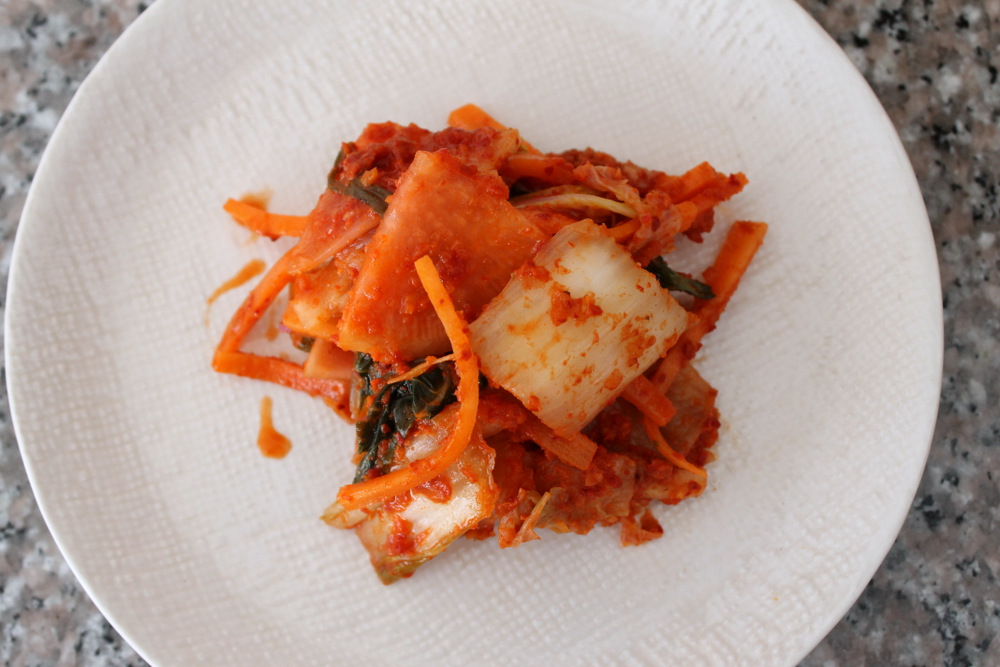
Finally, pack the vegetables into a large glass jar. I have one 2-quart jar that I like to use for kimchi, but you can use smaller jars if that’s what you have. Press the vegetables down into the jar (still wearing those gloves), and then use a chopstick or long skewer to break up any bubbles that have formed in the mixture. Now pour that reserved liquid from the bok choy mixture over the top of the pickles. This layer of salty liquid will help to reduce the amount of oxygen that reaches the kimchi fermenting below. Now close the lid loosely and set the jar in a cool, dark place to ferment.

Sponsored

Since the chili paste already contains fermented ingredients (salted shrimp) as well as sugar from the Asian pear, fermentation will begin quickly. In as soon as 12 hours, you may begin to see bubbles forming in the vegetables and a separation line between the vegetables and the kimchi liquid. Taste the kimchi every 12 hours or so. Once it begins to taste a little tangy, move the jar to the fridge. At this point, the kimchi is ready to eat, but there’s no rush. The kimchi will continue to ferment, albeit slowly, in the fridge, and you can continue to eat the kimchi throughout many stages of fermentation. In its early stages, the kimchi will be relatively mild and best eaten raw. After a few weeks, it may begin to taste funkier than you’d like; at this point, it works well in soups, stir-fries, and even grilled cheese—don’t knock it ‘till you try it.

*The bacteria produced during the fermentation of kimchi are a species of lactobacillus named after the pickle. These bacteria thrive in a salt-rich environment, and are so prolific that they are able to displace any other forms of (likely more insidious) bacteria. Lactobacillus kimchi are happiest in an anaerobic, or oxygen-free, environment, so it is best to keep the fermenting vegetables away from as much oxygen as possible. This is why I like to add the salty cabbage water on top of the pickles. Why not simply seal the top of the fermenting jar? The by-product of all of this fermentation is carbon dioxide, which will build up and create pressure in the jar. While it is unlikely that a jar of kimchi fermenting at room temperature for three days will explode, I still like to be careful. Opening and closing the lid to check on the kimchi flavor will also help to release pressure in the jar.

DIY seasonal kimchi with radishes and carrots. Photo: Kate Williams

Recipe: DIY Kimchi

Note: To make vegan kimchi, you can substitute 2 tablespoons white miso paste or 1 tablespoon soy sauce for the salted shrimp. Kochukaru and salted shrimp are available at Korean supermarkets like Koreana Plaza in Oakland or Woori Food Market in San Francisco.

Ingredients

  • 1 large head bok choy, sliced into 2-inch pieces
  • 1/2 large head napa cabbage, sliced into 2-inch pieces
  • 2 tablespoons kosher salt
  • 1 head (10 to 12 cloves) garlic, separated into cloves and peeled
  • 1 bunch (8 to 10) scallions, white parts chopped, green parts sliced into 2-inch lengths
  • 1/4 Asian pear, peeled and chopped
  • 1/2 cup Korean chili flakes (kochukaru)
  • 2 tablespoons salted shrimp
  • 1 (1-inch) piece fresh ginger, peeled and sliced thin
  • 2 carrots, peeled and julienned
  • 1 (4-inch long) daikon radish, peeled and julliened
  • 1/2 watermelon radish, halved and sliced into thin wedges

Equipment

  • Food processor
  • 1 (2-quart) glass jar or 2 (1-quart) glass jars
  • 1 chopstick

Sponsored

Instructions

  1. Combine the bok choy and cabbage with kosher salt in a large bowl. Rub the salt into the leaves, squeezing gently, until the leaves begin to wilt. Let mixture rest until the bok choy and cabbage leaves soften and release at least 1/2 cup of liquid, 1 to 2 hours.
  2. Meanwhile, make the chili paste by combining the garlic cloves, scallion whites, Asian pear, chili flakes, salted shrimp, and ginger until the mixture forms a paste.
  3. Once the bok choy and cabbage have softened, drain the leaves, reserving the liquid. Mix the wilted greens with the scallion tops, carrots, daikon, and watermelon radish in a large bowl.
  4. While wearing rubber gloves, mix the chili paste into the vegetables using your hands. Massage the paste into the vegetables. Firmly pack the vegetables into a 2-quart glass jar. Use a chopstick to pop any bubbles that have formed in the jar. Pour released cabbage liquid over the top of the vegetables to cover.
  5. Lightly close jar and set in a cool, dark place until the vegetables begin to ferment, 1 to 3 days. Bubbles will form in the jar and the vegetables may separate from the liquid. Move the kimchi to the refrigerator. The kimchi can be served as soon as it ferments or until it no longer tastes appealing. Old kimchi can be cooked into soup or added to stir-fries.

lower waypoint
next waypoint
Samosas aren’t from India…Wait, what?Food Labeling: How to Identify Conventional, Organic and GMO ProduceSpringtime Delight: Rhubarb Puff-Tart PocketsCheck, Please: How to Pay without looking like a fool or making everyone uncomfortable.Bored of Apples and Walnuts? Try Adding Date Charoset to Your Passover Table This YearJosey Baker Bread: Baking for Bros, with Gluten-Free Adventure Bread RecipeBay Area Bites Guide to 8 Great Places to Buy Fresh FishDIY Bone Broth - You Really Should be Making It at HomeTaste Test: Store-bought Raw Sauerkrauts are Surprisingly DistinctiveFromage de Chat (aka Cat Milk Cheese)