upper waypoint

Caramel Apples

Save ArticleSave Article
Failed to save article

Please try again

caramel apple

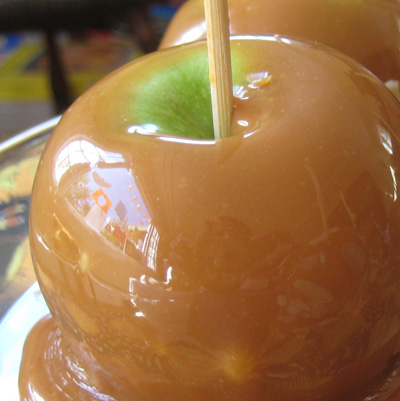
When I mentioned to a few friends that I was making caramel apples, I got the same response every time. "Yum! Can I have some?" Caramel apples are one of those treats both kids and adults love. There’s something about sweet and sticky caramel coated over a crisp and slightly tart apple that is truly a match made in heaven. These treats are great all year long, but fall seems an especially perfect time for to indulge. Maybe it's because apples are in season, or perhaps it's the promise of more sticky sweets on Halloween, but October has always seemed like the ideal time to make candy apples.

I hadn't made caramel apples in years, but when I saw one apple priced at $22.50 in the Williams Sonoma catalog (yes… $22.50 for one apple!), I knew I had to make a batch. From what I could remember, making caramel apples was easy and fun. And, in these times of failing 401Ks and plunging stock markets, it’s nice to also pay less than $1 for each one.

After conducting a little Internet research, I learned that many people prefer using melted caramel candy instead of homemade caramel. According to Sara Moulton, of the Food Network’s “Sara’s Secrets” and also of Gourmet Magazine, melted store-bought caramel stays firm and also creates a consistency that is tender to bite into, while homemade caramel has a tendency to become hard. It also turns out that using pre-made caramel makes the entire process ridiculously easy.

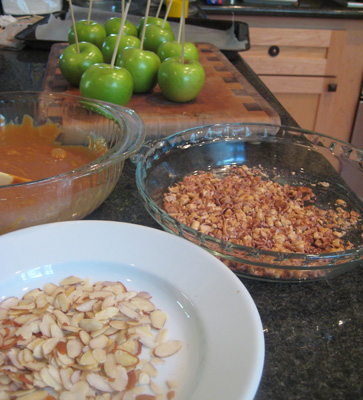
With this in mind, I bought a couple of packs of caramels, apples, and skewers (to hold the apples, although you could just as easily use popsicle sticks). I chose small granny smith apples as I wanted each treat to be firm and slightly tart, while also being a manageable size (i.e., not enormous, which would lead to half of it getting thrown out or a major child sugar rush). Along with these items I also picked up some nuts because I love nuts on my candied apples.

Sponsored

Some recipes called for using milk or cream, but I stuck with the Brach’s package recipe, which included only the caramels and some water. Although I was tempted to cook the caramels on the stove, I ended up melting them in the microwave because I was concerned a hot pot could potentially burn one of the kids while they were coating the apples. The result was melted caramel that had a nice creamy consistency in a bowl that was easy to tilt and handle.

sophie with apple

My daughters and their friend were only too happy to help out -- or rather take over -- the task and they did a great job with very little adult assistance or supervision. It turned into a great craft/cooking session with lots of laughing and finger licking. The project was also much more cost effective than the Williams Sonoma apples. All the ingredients cost about $15 and we ended up with 16 caramel apples -- some plain and others decorated with nuts and chocolate. For full disclosure, I must mention that the Williams Sonoma apple is two pounds and looks perfect, but that still seemed like a lot of money for one apple, especially as I could care less how it looks. But high cost or not, making homemade caramel apples is just way more fun than ordering them and waiting for the mail to arrive. I definitely need to turn this into a yearly event.

carmel apple prep and work area

Homemade Caramel Apples

Makes: 4 – 8 candy apples

Ingredients:
4 large or 8 small Granny Smith Apples
1 14 oz package of caramels
2 Tbsp water
4 – 8 thick wood skewers or popsicle sticks
Nuts (optional)
Melted chocolate (optional)

Preparation:
1. Wash and dry apples and remove the stems.
2. Set a skewer or popsicle stick into each one, through the stem hole, being sure to poke them down at least halfway through the fruit.
3. Set nuts in a bowl and place in your work area, if using.
4. Line a 9 x 13 baking sheet with waxed paper that has been sprayed with oil (oil side up) and place in your work area.
5. Remove the wrappers from the caramels and then place in a microwave-safe bowl with the water.
Note: You can also heat the caramels and water on the stove. Just place them in a pot and slowly heat on low.
6. Heat caramels and water for two to three minutes, stirring every minute to help incorporate the candy with the water and to check for readiness.
7. Once the caramel’s consistency is like chocolate syrup, you’re ready to stop heating it and dip your apples.
8. Place the bowl of caramel on your work station and start dipping in your apples, holding the sticks and tilting the bowl. Use a spoon to help cover the apple with caramel if needed. If the caramel starts to clump or become too thick, just microwave for another 20 seconds and stir.
9. Dip the caramel-coated apple in your nuts (if using). Be sure to do this directly after dipping the apples in the caramel and before they begin to set.
10. Drizzle on melted chocolate if desired.
11. Place apples on the oiled wax paper when finished.
12. Set apples in the refrigerator for at least 15 minutes and serve.

lower waypoint
next waypoint
Samosas aren’t from India…Wait, what?Springtime Delight: Rhubarb Puff-Tart PocketsFood Labeling: How to Identify Conventional, Organic and GMO ProduceCheck, Please: How to Pay without looking like a fool or making everyone uncomfortable.We Recreated an It's-It Ice Cream Sandwich at Home — With an Oakland Twist.Josey Baker Bread: Baking for Bros, with Gluten-Free Adventure Bread RecipeBored of Apples and Walnuts? Try Adding Date Charoset to Your Passover Table This YearTaste Test: Store-bought Raw Sauerkrauts are Surprisingly DistinctiveFromage de Chat (aka Cat Milk Cheese)DIY Bone Broth - You Really Should be Making It at Home